Most homeowners see solar panels as sleek black rectangles mounted on rooftops. Clean. Simple. Almost boring, honestly.
But here’s something most people don’t know: what looks like a flat pane of dark glass is actually one of the most precisely engineered products you’ll ever put on your home. Each panel has gone through a manufacturing journey that begins with ordinary sand, passes through temperatures hotter than lava, involves near-atomic levels of purity control, and ends only after passing a battery of tests that would make a car manufacturer nervous.
I remember speaking with a homeowner who assumed solar panels were mostly glass — like a fancy window that somehow made electricity. He was genuinely stunned to learn that the glass is almost just packaging. The real action happens in a razor-thin layer of silicon cells hidden underneath. Once he understood how those cells are made and what goes into protecting them, his whole attitude toward the investment changed. He stopped seeing it as buying an appliance and started seeing it for what it is: decades of precision engineering working silently on your roof.
In this guide, we’ll walk through everything — what solar panels are made of, how solar cells are manufactured from scratch, how individual cells become a complete panel, and what quality testing happens before a panel ever leaves the factory. Whether you’re a homeowner weighing up a quote or just genuinely curious, this is the complete picture.
What Are Solar Panels Made Of?
Before we follow the manufacturing process step by step, it helps to understand what a finished panel actually contains. Because “solar panel” is really shorthand for a multi-layer sandwich of very specific materials, each one doing a job no other material in the stack can do.
According to the Institute for Sustainable Futures, a typical solar panel is composed of roughly 76% glass, 10% polymers, 8% aluminium, 5% silicon, 1% copper, and less than 0.1% silver plus trace amounts of other elements. That breakdown surprises most people — glass dominates by weight, while silicon (the actual electricity-producing material) accounts for a surprisingly small fraction.
Here’s what each component does:
| Component | Material | Primary Function |
|---|---|---|
| Top layer | Low-iron tempered glass | Weather protection, light transmission |
| Encapsulant (front) | EVA (Ethyl Vinyl Acetate) film | Bonds cells to glass, keeps moisture out |
| Solar cells | Crystalline silicon | Converts sunlight into electricity |
| Encapsulant (rear) | EVA film | Bonds cells to backsheet |
| Backsheet | Polymer (or glass) | Electrical insulation, UV/weather protection |
| Frame | Aluminium | Structural support, mounting |
| Wiring | Copper | Carries electricity out of the panel |
| Contacts | Silver paste | Collects current across cell surface |
| Junction box | Plastic + bypass diodes | Routes electricity, prevents hotspot damage |
Glass
This isn’t the glass in your window. It’s low-iron tempered glass, specially formulated to transmit as much light as possible while shrugging off hail, heavy rain, and decades of UV exposure. Standard glass has a greenish tint caused by iron content, which absorbs some of the light you actually need reaching the cells. Low-iron glass is essentially colourless, maximising transmission.
Silicon Solar Cells
This is where electricity is born. Silicon is a semiconductor — a material that can be engineered to release electrons when struck by photons of sunlight. The specific way solar cells are made from silicon is the most complex part of the entire manufacturing process, and we’ll walk through it in detail below.
It’s worth being clear on a distinction that trips up many first-time buyers: a solar cell and a solar panel are not the same thing. A solar cell is a single electricity-producing unit, typically about the size of your palm. A solar panel (or solar module) is a collection of those cells — typically 60 to 72 of them — wired together and sealed inside the protective layers described in this section. The panel is the housing; the cells are the engine.
Encapsulant (EVA Film)
Ethyl Vinyl Acetate is a transparent, rubber-like polymer that wraps around the silicon cells on both sides, bonding them to the glass above and the backsheet below. It keeps moisture, oxygen, and contaminants away from the cells for decades. The quality of the EVA is more important than most people realise — poor-quality encapsulant is one of the primary causes of premature panel degradation, especially in humid coastal climates.
Backsheet
The backsheet is the panel’s weather-resistant underbelly. It provides electrical insulation (preventing shock if someone touches the back of the panel) and protects against UV radiation, heat, and moisture from below. Some premium panels now use glass on both sides instead of a polymer backsheet, which improves durability and longevity significantly.
Aluminium Frame
The outer aluminium border holds everything together, protects the edges of the glass from chipping, and provides the mounting points your installer uses to attach the panels to your roof. Aluminium is the obvious choice here — it’s lightweight, strong, and naturally corrosion-resistant.
Junction Box and Wiring
On the back of every panel sits a small plastic box — the junction box. Inside are bypass diodes, which allow electricity to route around any cell that’s shaded or damaged, preventing localised overheating (called hotspots) that could degrade the panel over time. Copper cables exit the junction box and connect the panel to the rest of your solar system.
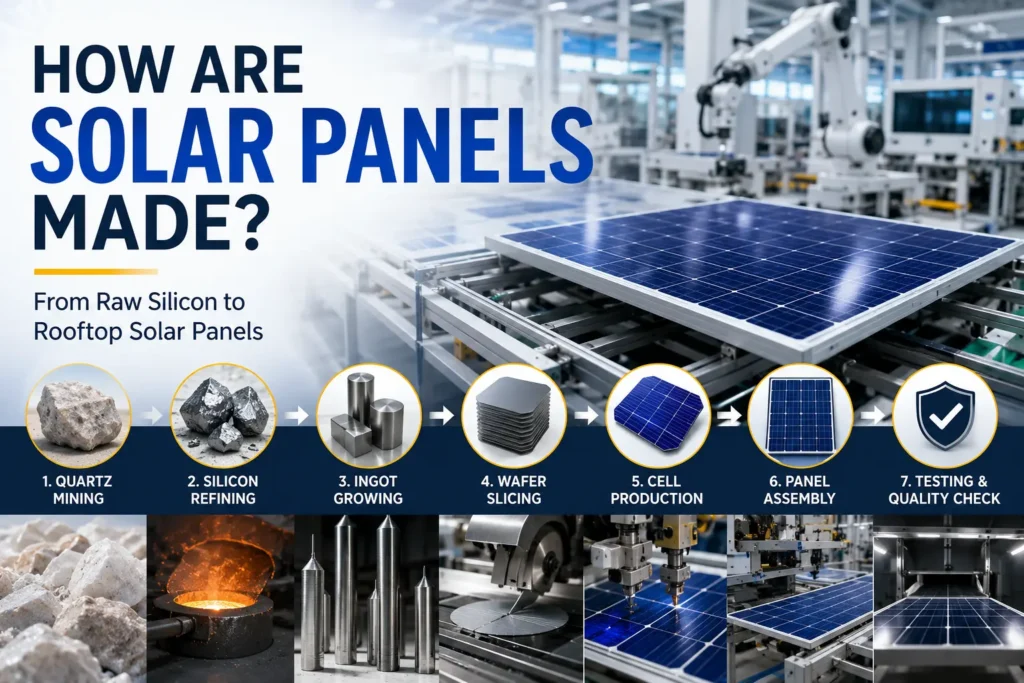
How Are Solar Cells Made? The Step-by-Step Process
This is where the real story begins. Making a solar cell is not simple — it requires industrial-scale precision, near-cleanroom conditions, and multiple processes that each have to go exactly right. Here’s how it works, from the ground up.
Step 1: It All Starts With Sand
Silicon is the second most abundant element in Earth’s crust. It’s everywhere — in rocks, soil, and yes, in ordinary beach sand. But the silicon in sand exists as silicon dioxide (SiO₂), chemically locked to oxygen. Before it can be used for anything electrical, that oxygen has to go.
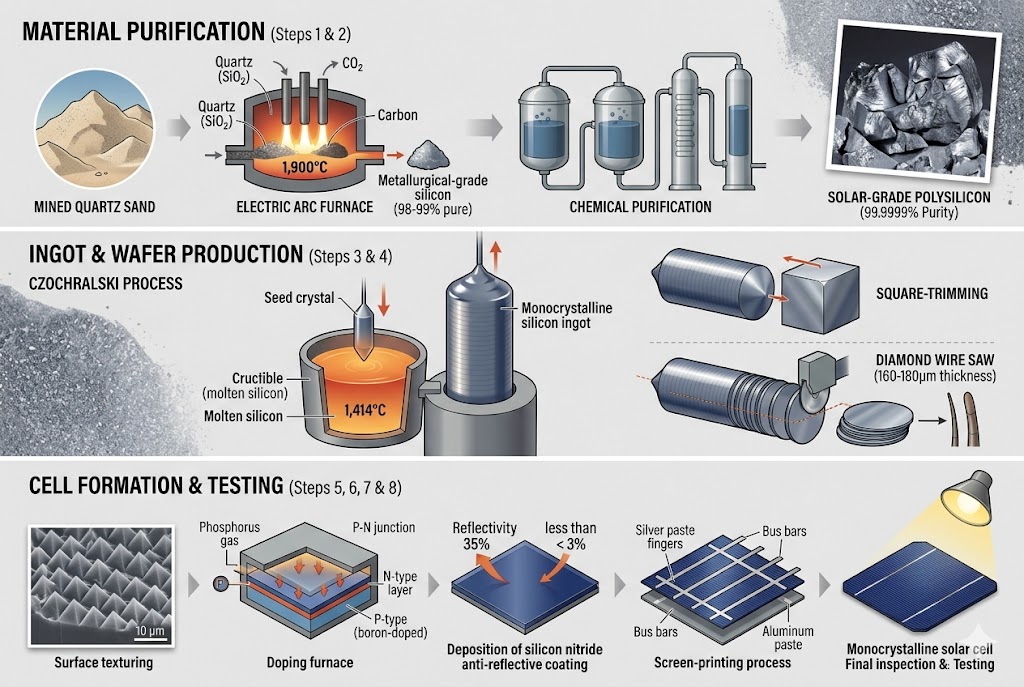
The first step is mining high-purity quartz — a crystalline form of silicon dioxide found in large deposits worldwide. This quartz is then fed into an electric arc furnace along with carbon material (usually coal or charcoal) at temperatures exceeding 1,900°C. The carbon reacts with the oxygen in the silicon dioxide, releasing it as CO₂ and leaving behind metallurgical-grade silicon, which is roughly 98–99% pure silicon.
That sounds impressive until you learn that 98% purity isn’t remotely good enough for solar cells. Even trace amounts of the wrong impurities can dramatically reduce a cell’s ability to generate electricity. So the silicon has to be refined further.
Step 2: Producing Solar-Grade Silicon
Metallurgical silicon is fed through additional chemical processes — the most common being the Siemens process — to produce solar-grade polysilicon. This material must be at least 99.9999% pure. That’s sometimes called “six-nines purity,” and achieving it requires considerable energy and chemical processing.
This purification stage is the most energy-intensive part of solar manufacturing, accounting for roughly 45% of a panel’s total manufacturing carbon footprint. It’s the main reason the solar industry is working hard to shift production toward renewable energy sources — manufacturing panels with clean energy makes their lifecycle footprint dramatically lower.
The result of all this work is polysilicon: chunks of silvery material that look a bit like broken glass, and which will eventually become the electricity-generating heart of a solar panel.
Step 3: Growing Silicon Ingots
Purified polysilicon is melted down again (at around 1,414°C) and then carefully solidified into large blocks called ingots. How this is done determines what type of solar cell you end up with.
For monocrystalline cells, manufacturers use the Czochralski process. A tiny silicon seed crystal is dipped into the molten silicon and then slowly pulled upward while rotating. As it rises, silicon from the melt crystallises around it in a perfect lattice, forming a large cylindrical ingot with a single, uniform crystal structure. This is slow, precise work — a full ingot can take over 24 hours to grow. The result, however, is silicon with an incredibly consistent molecular structure, which allows electrons to flow through it with minimal resistance. Monocrystalline panels made from this silicon typically achieve efficiencies of 20–23%.
For polycrystalline cells, the molten silicon is simply poured into a square mould and allowed to cool. Multiple crystals form in random orientations as it solidifies. The process is faster and cheaper, but those misaligned crystal boundaries create friction for moving electrons, resulting in slightly lower efficiency — typically 15–17%.
Step 4: Slicing the Ingots into Wafers
The ingots are trimmed to shape (monocrystalline cylinders are cut to a pseudo-square profile to reduce wasted space in a panel) and then sliced into thin discs called wafers using diamond wire saws — essentially extremely fine abrasive wires that cut through silicon like a precise wire cheese cutter.
The target thickness is around 160–180 micrometres — roughly the diameter of two human hairs side by side. Precision here is critical. Too thick and you’re wasting expensive silicon; too thin and the wafer becomes fragile and prone to breaking during subsequent processing.
A significant amount of silicon is lost in the cutting process as fine powder, known as kerf loss. Recovering and recycling this material is an active area of improvement in the industry.
Step 5: Surface Texturing and Cleaning
Fresh wafers are chemically cleaned to remove saw damage and surface contamination, then etched with an alkaline solution to create microscopic pyramid-shaped structures across the surface. These tiny pyramids scatter incoming light in multiple directions, dramatically reducing the amount that reflects off the cell and bouncing more photons down into the silicon where they can do useful work.
This texturing step — invisible to the naked eye — can improve light absorption by several percentage points, which translates directly into higher efficiency.
Step 6: Doping — Building the Electric Field
This is the step that actually turns a piece of silicon into a solar cell. Doping is the deliberate introduction of tiny amounts of specific impurities into the silicon to create layers with different electrical properties.
The bottom layer (P-type silicon) is doped with boron. Boron has one fewer electron than silicon, so it creates “holes” — positions where an electron should be but isn’t. These holes behave like positive charges and give this layer a positive character.
The top layer (N-type silicon) is doped with phosphorus. Phosphorus has one extra electron compared to silicon, creating free negative charges.
The doping happens through thermal diffusion: wafers are heated in a furnace while exposed to phosphorus gas, which diffuses into the top layer of the silicon.
Where P-type and N-type silicon meet — the P-N junction — a built-in electric field forms automatically. This is the fundamental engine of every solar cell. When sunlight hits the cell and knocks electrons loose, the electric field pushes them in one direction, producing a directional current. For a deep explanation of how this generates electricity that can power your home, see our complete guide to how solar panels work.
Step 7: Applying Anti-Reflective Coating
Even after texturing, silicon reflects a significant portion of incoming light. A thin layer of silicon nitride is deposited over the cell surface using plasma-enhanced chemical vapour deposition (PECVD). This coating reduces surface reflectivity from around 35% down to less than 3% — a remarkable improvement that means nearly all incoming light is now captured rather than bounced away.
This coating is also why solar cells appear dark blue or near-black. The thin-film interference effect that gives cells their colour is an optical byproduct of the anti-reflective layer itself.
Step 8: Adding Metal Contacts
The cell needs a way to collect and carry the electricity it generates. Metal contacts are applied using a screen-printing process — essentially the same principle as printing a design onto a T-shirt, but with extraordinary precision.
Silver paste is printed in a fine grid of thin lines across the front of the cell. These lines (called fingers) collect electrons from across the cell surface, feeding them into wider horizontal strips (bus bars) that carry the current to the cell’s edge. Silver is used because of its exceptional electrical conductivity, though its high cost means reducing silver content per cell is a major ongoing focus for manufacturers.
Aluminium paste is applied across the entire back surface of the cell to form the rear contact.
The cell is then fired in a furnace at around 800°C. The paste burns through the anti-reflective coating and bonds directly to the silicon, forming strong, low-resistance electrical connections.
The cell is now complete. Each finished cell is tested individually under simulated sunlight using a solar simulator, measured for electrical output, and sorted by performance grade before moving to panel assembly.
How Are Solar Panels Made from Individual Cells?
A finished solar cell can generate around 0.5 volts — enough to measure with a multimeter, but not enough to run anything useful. To create a panel capable of powering a home, cells need to be interconnected and protected inside a durable module. Here’s how that assembly works.
Step 1: Connecting Cells into Strings
Cells are connected in series using thin copper strips coated in tin-silver solder. Each strip connects the front of one cell (negative contact) to the back of the next (positive contact), forming a “string.” Because they’re in series, the voltages add up: a string of 20 cells at 0.5V each produces 10 volts. Multiple strings are then connected in parallel to build up the current. A typical 60-cell residential panel contains three strings of 20 cells each.
This stringing process requires precise placement and soldering — slight misalignment or a poor solder joint can create a weak point that degrades performance or causes hotspots over time.
Step 2: Layering the Panel
The cell matrix is laid out on a flat surface in the following order, from top to bottom:
- Tempered glass (front face)
- EVA encapsulant film (front)
- Solar cells (connected in strings)
- EVA encapsulant film (rear)
- Backsheet (or rear glass)
This layered stack — called a “lay-up” — is assembled in an extremely clean environment. Dust, fingerprints, or any contamination between layers can create defects that reduce efficiency or lead to premature failure. Leading manufacturers run their assembly lines in environments with strict air quality controls to prevent exactly this.
Step 3: Lamination
The assembled stack is fed into a laminator — a large heated press operating under vacuum. The vacuum removes all air from between the layers, and heat causes the EVA film to melt and flow, permanently bonding the glass, cells, and backsheet into a single hermetically sealed unit.
This lamination is what gives a solar panel its long lifespan. Once laminated, the cells are fully protected from moisture, oxygen, and mechanical stress. The process typically takes 15–20 minutes per panel.
Step 4: Frame Installation
The laminated module is fitted into an aluminium frame using silicone sealant, which creates a watertight seal around the edges. The frame protects the glass edges from chipping and cracking and provides the attachment points your installer will use to secure the panel to your roof. Frames are typically anodised or powder-coated for corrosion resistance.
Step 5: Junction Box Installation
A junction box is attached to the back of the panel using adhesive and sealed against moisture. Inside, bypass diodes are soldered to the cell string terminals. These diodes are a critical reliability feature: if one section of the panel is shaded, its bypass diode allows current to route around the shaded cells rather than through them, preventing the hotspot heating that would otherwise degrade or damage the panel over time.
How Manufacturers Test Solar Panels Before Sale
This is one of the most overlooked parts of the manufacturing story — and one of the most important for homeowners to understand. A solar panel is only as good as its factory testing. Here’s what reputable manufacturers put every panel through.
Flash Testing (IV Curve Testing)
Every panel is placed under a calibrated flash of simulated sunlight and its electrical output is measured precisely. This confirms the panel’s actual power output (in watts) and assigns its nameplate rating. A panel marketed as 400W must produce at least that much under standard test conditions, or it doesn’t leave the factory with that label. Flash testing also identifies any cells that are underperforming or not connected properly.
Electroluminescence (EL) Testing
This is arguably the most powerful quality tool in a solar factory. A small electrical current is passed through the panel in reverse (the opposite of normal operation), causing the silicon cells to emit faint infrared light. A sensitive camera captures this light and produces a map of the entire cell matrix.
Microcracks, broken cell interconnections, and areas of reduced efficiency all show up as dark patches in the electroluminescence image — defects that are completely invisible under normal white light. Catching these at the factory, before the panel is shipped, prevents failures and warranty claims later. Advanced manufacturers now use AI-powered image analysis to process EL images faster and catch subtler defects that human inspectors might miss.
Mechanical Load Testing
Panels must withstand significant physical stress over their lifetime — snow loads, wind uplift, maintenance workers accidentally stepping near them. Load testing involves applying uniform pressure across the panel surface (both front and back) equivalent to the static loads the panel would experience in service. Panels are tested to standards including IEC 61215, which is the internationally recognised certification for crystalline silicon modules.
Weather Resistance and Thermal Cycling Testing
Panels go through accelerated weathering cycles: extreme heat, extreme cold, humidity, UV exposure. Thermal cycling tests (rapid repeated cycling between -40°C and +85°C) reveal whether the lamination and connections can handle the expansion and contraction that happens over years of real-world temperature swings. Panels that survive these tests without delaminating or showing electrical degradation earn their 25-year performance warranties.
Electrical Safety Testing
Before leaving the factory, each panel is tested for insulation resistance (to confirm no electricity can leak through the frame or backsheet), dielectric strength, and wet leakage current. These tests confirm the panel is safe to handle and install, protecting both installers and end users.
How Long Does It Take to Manufacture a Solar Panel?
The actual manufacturing process — from raw polysilicon to finished, tested panel — takes roughly two to three days at a modern, highly automated factory. Cell manufacturing (ingot growth through contact printing and testing) takes most of that time, while panel assembly and lamination adds several additional hours.
What takes far longer is everything around manufacturing: supply chain lead times for raw materials, quality hold periods, shipping from Asia to markets in Australia, Europe, or the Americas. By the time a panel reaches your installer’s warehouse, six to twelve weeks may have passed since its silicon was still sand.
Automation has transformed the industry. Modern solar factories use robotic arms, automated conveyors, and machine vision systems for nearly every step, dramatically reducing human error and increasing throughput. The world’s largest factories can produce millions of panels per year.
Is Manufacturing Solar Panels Environmentally Friendly?
This is the question every honest solar article needs to address — and it deserves a balanced answer, not a promotional one.
The Energy Cost of Manufacturing
Manufacturing solar panels does require significant energy, primarily in the silicon purification stage. This energy is often (though increasingly less so) sourced from fossil fuels, which means there is a real, upfront carbon cost to making each panel. The IPCC estimates lifecycle emissions from rooftop solar at around 41 grams of CO₂ equivalent per kilowatt-hour — far below coal (820g/kWh) or gas (490g/kWh), but not zero.
Carbon Payback Period
The good news is that solar panels repay their manufacturing carbon relatively quickly. Studies consistently show that most modern panels offset their production emissions within 1 to 4 years, depending on your local sunlight and how carbon-intensive your grid is. In sunny regions like most of Australia, the payback period is at the shorter end of that range. With a panel lifespan of 25–30 years, it spends the vast majority of its life producing genuinely clean electricity.
Recycling Progress
The end-of-life picture is more complicated. Panel materials — the glass, aluminium frame, and copper wiring — slot into existing recycling streams relatively easily. Recovering silicon and silver from decommissioned cells is technically feasible and increasingly economical. The challenge is the polymer encapsulant, which bonds everything so tightly that separating it requires significant heat and processing.
Without widespread recycling infrastructure, the industry faces a growing waste challenge as the first major generation of solar panels reaches end of life. However, manufacturers are investing in recycling technology, and some are now powering their factories entirely with renewable energy — reducing both the manufacturing footprint and the waste problem simultaneously.
Why Modern Solar Panels Last So Long
A common question from homeowners is: if there are no moving parts, what actually wears out?
The primary degradation mechanism in silicon solar cells is gradual reduction in efficiency over time — typically around 0.5% per year under standard conditions, meaning a panel rated at 400W in year one might produce around 370W in year 25. That’s well within the performance range covered by most manufacturer warranties (which typically guarantee 80% of nameplate output after 25 years).
The materials science choices described in this article are exactly what make that durability possible: tempered glass that resists hail and UV, EVA encapsulant that keeps moisture out of the cells for decades, aluminium frames that resist corrosion, and rigorous factory testing that catches defects before they ship. It’s not magic — it’s precision manufacturing backed by international quality standards.
Common Myths About How Solar Panels Are Made
Myth 1: Solar Panels Are Made From Rare or Exotic Materials
Silicon is the second most abundant element in Earth’s crust. Glass, aluminium, and copper are globally available commodity materials. The only genuinely scarce element in conventional solar panels is silver, which is why manufacturers have been systematically reducing the amount of silver paste used per cell for the past decade. Modern panels use roughly half the silver of panels made ten years ago — and the trend continues.
Myth 2: Manufacturing Solar Panels Creates More Pollution Than Solar Ever Saves
This is a persistent myth that the numbers simply don’t support. Even accounting for the energy-intensive silicon purification process, lifecycle analyses consistently show that solar panels offset their manufacturing emissions within 1–4 years and then produce clean electricity for another 20+ years. Over a full lifespan, a solar panel prevents somewhere between 20 and 50 times more CO₂ than was emitted making it, depending on the local grid mix.
Myth 3: Solar Panels Wear Out Quickly
Modern solar panels are warranted for 25 years and routinely last 30 or more. The degradation rates of well-made panels are low enough that the electricity output reduction over a lifetime is modest — typically around 15–20% over 25 years. The factory testing regimes described in this article — thermal cycling, load testing, EL inspection — exist specifically because manufacturers know their products need to survive decades of real-world conditions.
Frequently Asked Questions
Solar panels start as purified quartz sand, which is refined into solar-grade silicon, grown into crystalline ingots, sliced into wafers, doped to create an electric field, coated to reduce reflection, printed with silver contacts, and then assembled with glass, encapsulant, and a frame before passing quality testing.
Solar cells are made by purifying silicon to extreme purity, growing it into ingots, slicing it into thin wafers, texturing the surface, doping with boron and phosphorus to create a P-N junction, applying an anti-reflective coating, and screen-printing silver and aluminium electrical contacts.
By weight, solar panels are approximately 76% glass, 10% polymers, 8% aluminium, 5% silicon, 1% copper, and less than 0.1% silver and other trace elements. The glass and aluminium provide protection and structure; the silicon cells generate electricity; the copper and silver conduct it.
Indirectly, yes. The silicon in solar panels is derived from quartz (silicon dioxide), which is abundant in sand and rock formations. However, it undergoes extensive high-temperature processing and chemical purification before it can be used in solar cells — it’s a long way from the beach to your rooftop.
Important: Never use harsh chemicals or abrasive sponges on your panels, as scratching the glass will permanently lower their output.
The manufacturing process itself takes roughly two to three days at a modern automated facility. However, including supply chain logistics and shipping, the time from raw material to installed panel is typically several months.
Yes, most components are recyclable. Glass (~75% of panel weight), aluminium frames, and copper wiring all fit within established recycling streams. Silicon and silver can also be recovered. The main challenge is the polymer encapsulant, which bonds everything tightly and requires energy-intensive processing to separate. Industry-wide recycling infrastructure is still developing.
Silicon is the core material — without it, there’s no electricity generation. But the quality of the encapsulant and glass are arguably just as important for longevity, since they’re what protect the silicon cells from the elements over 25+ years.
China accounts for more than 80% of global solar panel production as of 2025. Manufacturing capacity is also growing in Southeast Asia, India, the United States (partly driven by the Inflation Reduction Act), and Europe, with the industry gradually diversifying its supply chain.
Conclusion
From a pile of quartz sand to a panel quietly generating clean electricity on your roof — it’s quite a journey.
Silicon gets purified to near-atomic perfection, grown into crystals, sliced into wafers thinner than two human hairs, engineered with an invisible electric field at the boundary of two layers, coated to capture every photon it can, and printed with contacts finer than a strand of silk. Then those cells are connected, layered with glass and protective films, laminated under heat and vacuum, framed in aluminium, and put through a battery of tests before they earn the right to carry a wattage rating.
Understanding this process changes how you think about the product on your roof. It’s not a pane of glass with some wires. It’s a precision-engineered device designed to work reliably for three decades, in rain, hail, heat, and cold — with no moving parts and no fuel.
Now that you know how solar panels are made, the natural next question is: what happens the moment sunlight actually hits them? How does that electric field we described turn photons into the electricity running your appliances right now? That part of the story is covered in full in our guide to how solar panels work — and having read this article first, you’ll find it clicks into place beautifully.
Sources: Institute for Sustainable Futures; International Panel on Climate Change (IPCC); EcoFlow; SolarReviews; Ossila Materials Science; PVGIS; EDP Renewables; Intertek CEA; Sinovoltaics; SDC Automation; The Eco Experts; NREL